This post will cover adding a custom header image to the New Version of Blogger. The one that features a layout with widgets. If your bog is using a "Classic" template you will want to read these posts instead.
If you are using New Blogger's Minima template this is the header you would have to start with:
Lets say you want to customize the standard header to a photo or graphic you created such as this:
You first want to upload your image to a hosting service so you will have an internet address for it. If your not familar with this process, read
this post before you continue.
!Remember to make a backup copy of your template before making any changes!Once you have the address of your image your next step is to set it as your headers background. This is done in the style sheet section of your template where the the code that formats the header resides. Note: the image your going to use should be 10px smaller than the width of the #header-wrapper. In the case of a standard Minima template this width is 660px, so you will want your image to be 650px wide. This adjustment is to allow for the set margins. You could also increase the width of the #header-wrapper to compensate. Be aware that the #header and #header-wrapper are two different elements.
The CSS:
#header { margin: 5px; border: 1px solid #cccccc; text-align: center; color:#666666;
}
We will add the following lines of code to the #header element:
background: url(http://your image address.jpg) no-repeat;height: 130px;Besides setting the background image, we added a height attribute equal to the height in pixels of our image. In our example it is 130px. I also suggest that you remove the border around the #header by changing the border attribute to 0px. You will also need to change the border setting of the #header-wrapper to 0px (not shown) This now gives us the following as the CSS for the entire #header element:
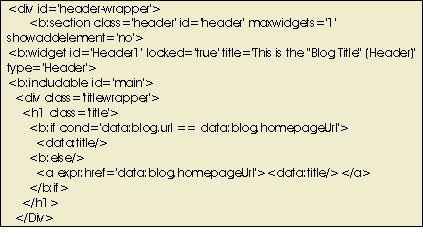
#header {background: url(http://your image address.jpg) no-repeat;height: 130px;margin: 5px;border: 0px solid #cccccc;text-align: center;color:#666666;}We are not done quite yet, we still need to make a change to the HTML portion of the template. When you created your blog you gave it a title and a description. These items can be changed under the settings menu and are automaticly added to your header. So that these items don't display on top of your newly created image, you want to eliminate them from the header. The best way to eliminate the description is to leave it blank under the settings menu. Blogger requires that you enter a title because not only does it display in the header but also at the top of your browser. In order to remove the title from the header you will need to go to the template section and with the "Expand Widget Templates" box checked, find the following code.
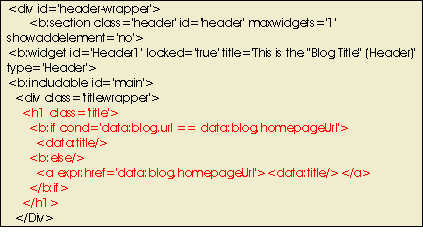
Notice that there is a H1 tag that displays your title, you will want to delete the entire tag contents as shown in red below:
Having made these changes be sure to save them and you will be good to go. To view the end results of this exercise in a New Blogger template
Click Here.
Technorati Tags: blogger beta, new blogger, custom header
 Google has a search engine database that is strictly comprised of blogs. In its beta version, Google blog search has a user base of over 20,000 which makes it a great resource for obtaining traffic to your site.


